Hey y'all! Today I have another polish that I snagged at last years local nail meetup. I think I still have a few more to swatch, but for now this is the last one of the batch. It's so beautiful and spring-y. Totes love it.
As usual, I used Seche Vite as my top coat for these swatches.
The color of this is showing more blue, to me, on screen but it's kind of a mix between a pastel blue and lavender.
I only needed 2 coats for this cream finish.
This will definitely re-appear on my nails come spring time. It looks like the perfect base for some nail art.
Showing posts with label Color Club. Show all posts
Showing posts with label Color Club. Show all posts
Tuesday, January 31, 2017
Tuesday, January 24, 2017
Color Club - Matte Rouge - Makeout Maven
Hey y'all! Today I have another polish I got in last years meetup
swap. It also happens to be the other one from the Matte Rouge
collection. I'm kinda back & forth on liking it, but I'm keeping it
either way.
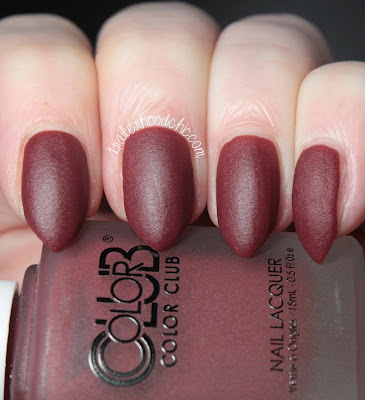
The polishes in this collection have a matte, though more satin, finish with a slight texture to them. Unlike the Zoya Pixie Dusts, these are smooth.
Since they're matte, I didn't use any top coat, and used 2 coats for these swatches.
This color is so difficult to describe. Depending on the lighting it looks brown-ish red, but then again it looks almost like a wine. So I wrote down a mauvey brown & then brick red.
I might have to wear this again to see how I feel about it for sure.
Wednesday, January 18, 2017
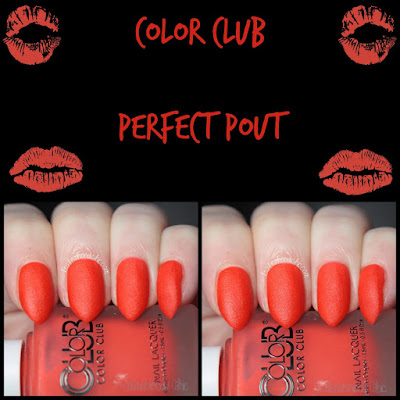
Color Club - Matte Rouge - Perfect Pout
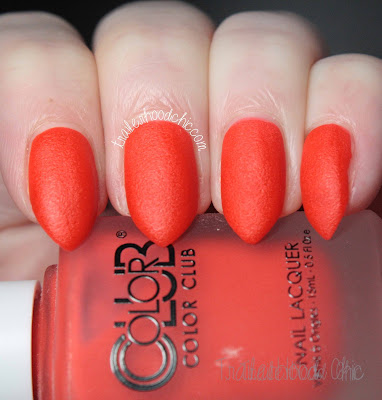
Hey y'all! Last year I did a post after going to an Atlanta meetup for polish lovers & while at that meetup, we brought some stuff to destash. I grabbed a few and they've been sitting in my untrieds basket ever since. So I dusted them off and got to swatching. Today's beauty is from the Matte Rouge collection, idk when it released, and boy is it a new fav.
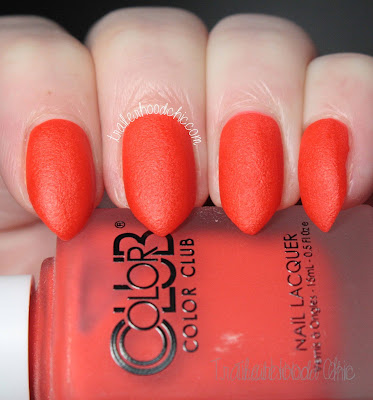
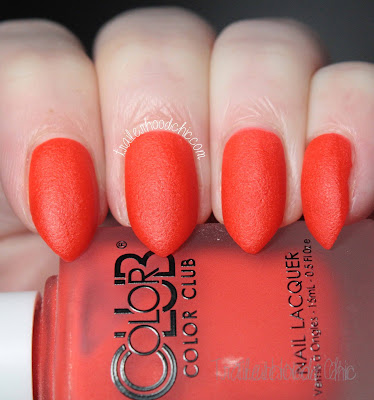
This has a matte finish so I didn't use any top coat. Though the finish is more satin than matte, and slightly textured.
It's a gorgeous bright orange, and looks like an orange peel.
I used 2 coats in this swatch, but you could probably easily get away with one if you're careful.
I have one more shade from this collection, which will be coming soon, and now I kinda want to get the rest.
Monday, March 28, 2016
Atlanta Nail Meetup - Springy Floral Nails & Haul
Hey y'all! It's been about a year since the last Atlanta Nail Meetup & a few weeks ago we met for lunch and polish shopping. Since then I've only purchased a few polishes, so I decided to splurge a little. And this year we had more ladies attend the fun!
We met up for lunch at a little Mexican restaurant, swapped some polishes we wanted to destash, chatted, and had a blast. Even better is that we're all polish addicts so we all had some beautiful mani's to share. This is mine....
I kinda winged this & while I wasn't happy with it at first, I'm really starting to love it. I got so many complements on it too, so I'm glad that I kept it instead of starting over.
The base is a gradient of Fresh Paint Guava and China Glaze Aquadelic (which is also the base on the accent nail). The stem of the flowers is Fresh Paint #Winning. The flowers are Fresh Paint Honeydew with Color Club Not-So-Mellow Yellow in the center.
The dots on the accent nail are everything except #Winning. I'm completely obsessed with peaches & aqua shades right now. And Guava seems kinda washed out in these pictures, this mani is actually a bit more bright in person.
After lunch we scooted over to a local nail supply store and had some fun. I could have done way more damage than I did, but some of the things I had on my list were out of stock. I actually had to keep reminding myself that I didn't NEED everything I was wanting to toss into my basket. Here's what I got...
Even though I had some anxiety issues, and traffic was HORRIBLE on the way back, I had a blast. No, seriously, it took me 50 minutes to get there and over 90 to get home. I'm excited to play with my new pretties & I can't wait for the next meetup.
We met up for lunch at a little Mexican restaurant, swapped some polishes we wanted to destash, chatted, and had a blast. Even better is that we're all polish addicts so we all had some beautiful mani's to share. This is mine....
I kinda winged this & while I wasn't happy with it at first, I'm really starting to love it. I got so many complements on it too, so I'm glad that I kept it instead of starting over.
The base is a gradient of Fresh Paint Guava and China Glaze Aquadelic (which is also the base on the accent nail). The stem of the flowers is Fresh Paint #Winning. The flowers are Fresh Paint Honeydew with Color Club Not-So-Mellow Yellow in the center.
The dots on the accent nail are everything except #Winning. I'm completely obsessed with peaches & aqua shades right now. And Guava seems kinda washed out in these pictures, this mani is actually a bit more bright in person.
After lunch we scooted over to a local nail supply store and had some fun. I could have done way more damage than I did, but some of the things I had on my list were out of stock. I actually had to keep reminding myself that I didn't NEED everything I was wanting to toss into my basket. Here's what I got...
- Brushes - because they always come in handy to clean under your nails...and even better when hands get really dirty.
- #14 Kolinsky brushes with a dotting tool on the end - The one I bought last year is still going strong as a clean-up brush and I thought it would be smart to get a few backups. SO much better, IMO than the $1 ELF brushes that seem to not even last through one use.
- Polishes (L to R) - China Glaze Hot Flash, Color Club Wham! Pow!, Color Club Port-folio, China Glaze Bite Me, China Glaze Papa Don't Preach, China Glaze My Way Or The Highway
Even though I had some anxiety issues, and traffic was HORRIBLE on the way back, I had a blast. No, seriously, it took me 50 minutes to get there and over 90 to get home. I'm excited to play with my new pretties & I can't wait for the next meetup.
Labels:
China Glaze,
Color Club,
Fresh Paint,
Green,
mint,
nail art,
Peach,
teal,
Yellow
Thursday, December 24, 2015
Star Wars Christmas Mashup Mani
Happy Christmas Eve y'all!!! So, the kiddo doesn't know it yet, but tomorrow night(Christmas Day) we are going to see the latest Star Wars movie, so NO SPOILERS PLEASE. Because of that, I wanted to do a Star Wars & Christmas mashup on my nails. He watched me do my nails, and LOVED them, and still has no idea.
Now while I'm still not 100% happy with them, I do love them. I guess it's the perfectionist in me & knowing that I can do better. They were pretty easy to do and I'll link the tutorials for where I got the inspiration on each of these from.
I used a LONG list of polishes, so I'll be sure to list everything down below as well.
For the lightsabers, my inspiration came from a recent video by Simply Nailogical, which you can see HERE. Though the only acrylic paint I used was the white, I did use polishes to paint over the white....because HOLO!
Blue Lightsaber: Wet N Wild Black Creme, Color Club Blue Heaven, & Revlon Royal
Green Lightsaber: Wet N Wild Black Creme, Nubar Reclaim, & Verity B24 Aqua Blue
Red Lightsaber: Wet N Wild Black Creme, ILNP Very Ornamental, & Wet N Wild I Red A Good Book
Christmas tree accent: China Glaze Angel Wings, ILNP A Fresh Evergreen, & stars from Salon Perfect Star Spangled. Tutorial can be found HERE!
I took this shot outside with my cell phone using the flash. Because we're having crappy weather, and I finished late at night, it was dark outside & I knew I wouldn't be able to get a full sun pic.
About the only thing I would do differently is maybe not use holo for the sabers? or use a glow in the dark over the white. What do y'all think?
Labels:
Black,
Blue,
China Glaze,
Color Club,
glitter,
Gold,
Green,
Holiday,
holo,
ILNP,
Nubar,
Red,
Revlon,
Salon Perfect,
Verity,
Wet N Wild
Wednesday, August 5, 2015
Color Club - The Uptown
Hey y'all! This is one of the last polishes from my Atlanta Nail Meetup purchase back in April. Since the Girl About Town collection released in 2013, I've wanted this polish. Sadly, the formula has changed and this isn't the gorgeous, original, flakie version.
The Uptown looks like grape soda mixed with gold, blue, & fuschia shimmer.
For these pics I only needed 2 coats before applying Seche.
My bottle was a little thick, so I applied a little thinner once I was done with swatches.
The Uptown looks like grape soda mixed with gold, blue, & fuschia shimmer.
For these pics I only needed 2 coats before applying Seche.
My bottle was a little thick, so I applied a little thinner once I was done with swatches.
Monday, July 27, 2015
Peachy Coral Neon Gradient Leopard Nails
Hey y'all! I have had a strange leopard print obsession lately when it comes to doing my nails. I think it's because this is super easy and looks great with a neon base. Especially for the summer. So if you want to see what I used, keep reading.......
This is the first time in a LONG time that my nails have actually matched my toes. It's not exact, but I do have one of these shades currently on my toes.
For this mani, I started off with a white base and a couple coats of China Glaze Flip Flop Fantasy.
Once that dried, I sponged on a gradient of FFF, Fresh Paint Guava, and China Glaze Surfin' For Boys. On the accent nail, I just applied Color Club Call Of The Disco Ball over top of FFF.
Then, using black acrylic paint and my dotting tool, I made some random leopard print designs on the rest of the nails before applying a top coat.
This is SO bright, and the gradient is so subtle that it looks like the light is hitting it differently. In fact, this almost looks all pink if the sun hits it just right.
What do y'all think?
Labels:
Acrylic Paint,
Black,
China Glaze,
Color Club,
Coral,
Fresh Paint,
gradient,
nail art,
Peach,
Pink
Wednesday, July 22, 2015
Color Club Call Of The Disco Ball
Hey y'all! Today I have yet another polish I purchased at the Atlanta Nail Meetup earlier this year. This is Call Of The Disco Ball from the Pastel Neon Remix collection, which are all glow in the dark glitter polishes.
For these swatches I used 3 coats alone, plus top coat.
This is a super sheer peach jelly glow in the dark base that is packed with what looks (to me) like a mixture of holographic and opalescent glitters.
Because of the sheerness I'd suggest layering this over either a white or peach base. I've done it, but you'll have to wait for that post :p
And now for the glow in the dark pics....
These shots were taken with my cell phone & was unusually difficult. The glow that the camera caught seemed to fade fast, but not to the naked eye. Also, you can see that it looks more green on the nail and more yellow in the bottle.
 |
| macro |
I had to be fast with the camera so I had the kiddo turn the light on & off for me when needed. Thankfully he didn't mind helping out because he thought the glowing was cool.
What are your favorites from this collection? I'm kinda wishing now that I'd grabbed a few more.
Wednesday, July 15, 2015
Color Club Foxy Mama
Hey y'all! Today I have another beauty from the Poptastic collection that Color Club released last summer. This was another one that I managed to snag while shopping after the Atlanta Nail Meetup back in April. I used to hate oranges, and still do....unless it's nail polish (or eyeshadow because it looks good with my blue eyes). This is no exception.
If you like orange, and NEON orange, this is your gal. It's that BRIGHT orange cream with a golden shimmer.
I only needed 2 coats and it dries kinda matte so it definitely needs a top coat.
I wore this on my toes for a month straight because I didn't want to change it. Even with my pale skin, and my feet are whiter than everything else, it looked great.
What are your favorite orange polishes?
Friday, July 10, 2015
Neon Pink Leopard Nails
Hey y'all! Today I have a bright leopard print design that I want to share with you. I was inspired by a pair of shoes that I saw on Pinterest, but I had to add some color other than the blue tips to it. I looked over at my untrieds basket and went with 2 pink shades. Then as I was saving the files, I noticed I apparently have a thing for leopard print nails.
I actually plan to recreate this again soon without the blue tips because I LOVED it so much. I didn't even want to take it off. If you want to see what I used and how I achieved this design, keep reading.
I started off with a base of Color Club Hot-Hot-Hot Pants.
Then I sponged Color Club Peace, Love, & Polish on about 2/3 of the nail. Using a makeup sponge helped diminish the neon a little and soften it a bit. Once that was done I put a top coat on before going to the next step.
Next I used black acrylic paint and a dotting tool to make the leopard spots. Normally I use a brush, but I think I actually liked how this turned out better. I put top coat under the paint so that if I didn't like it I could easily remove it without removing everything. In the end it wasn't needed, but it's always helpful.
Lastly, because the shoes had a bright blue toe, I used tape and applied some Bundle Monster stamping polish in #24 Royal Blue on 3 of the tips. Unfortunately, the blue was more sheer than I thought it would be and you can see the black under it. I think next time I'd use a white before the blue.
I'm really looking forward to doing this again. What do you think?
Labels:
Acrylic Paint,
Black,
Blue,
Bundle Monster,
Color Club,
nail art,
Pink
Subscribe to:
Posts (Atom)


